Due to my work requirements, I need to train and run AI models on my desktop. However, I only have one desktop available. Since I primarily use Windows as my operating system due to my preference for gaming and owning a MacBook Pro, I face a challenge when it comes to accessing GPU resources in virtual machines (VMs), such as when running Ubuntu through VirtualBox.
To address this issue, I conducted some research and discovered that Windows Subsystem for Linux (WSL) could potentially provide a solution. WSL allows me to set up a Linux environment directly within Windows, granting me easier access to GPU resources for AI model training and execution. This enables me to leverage the benefits of Linux-based tools and libraries while still utilizing my Windows system as the primary operating environment.
When installing WSL and related tools on Windows, the default installation location is usually the system drive (usually the C: drive). However, if I want to install them on a different drive with more available space, such as the D: drive.

While there are numerous online resources available to guide users, I often find that many of them tend to be unnecessarily complex, which can make it challenging to accomplish tasks that should be straightforward and intuitive.
Eventually, I discovered a post titled “Installing WSL Distro in a Different Drive on Windows” (https://helloglenn.me/blog/installing-wsl-distro-in-different-drive-win/) which precisely addressed my needs. However, while I followed the instructions provided, I observed that the process had slightly changed since the time the post was published.
Hence, I have an updated version of the instructions here that I’m keeping as a record.
Then, let’s get started!
- Make sure that you can use WSL command and do match the pre-requirements here (https://learn.microsoft.com/en-us/windows/wsl/install-manual). Of course, you can follow the suggestion to run
wsl --installdirectly, but everything will just be installed in C: drive. - Download Ubuntu distro to your machine. In the post (https://helloglenn.me/blog/installing-wsl-distro-in-different-drive-win/), the author selected Ubuntu 20.04 as his/her WSL distribution. However, in my case, I would like to use Ubuntu 22.04 instead. The download link is here (https://aka.ms/wslubuntu2204).
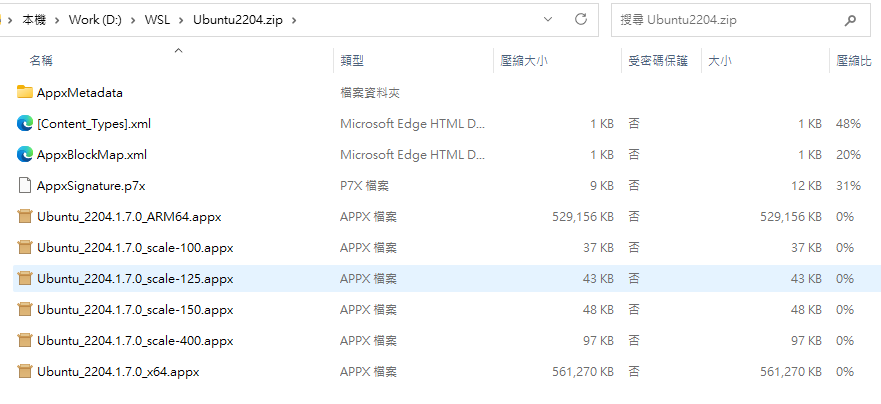
- Move the installation file to D: drive or any other drive where you want to install the system. In my case, I moved it to D: drive. You can see the file is named
Ubuntu2204.AppxBundle.
- Follow the instruction in the post (https://helloglenn.me/blog/installing-wsl-distro-in-different-drive-win/), we need to rename it to be
Ubuntu2204.zip, thne we can unzip it to getUbuntu2204folder which contains every type of installation for Ubuntu 22.04.
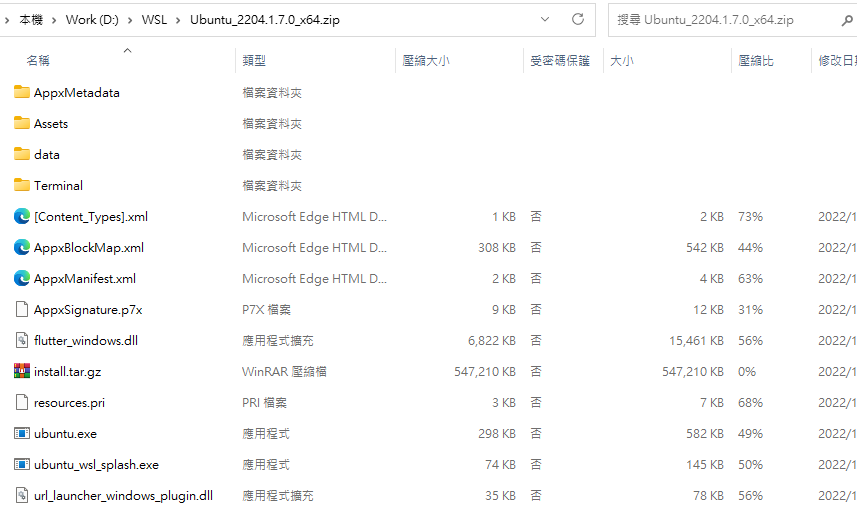
- I assume that most of us should use x64, so we need to do renaming again. Rename
Ubuntu_2204.1.7.0_x64.appxto beUbuntu_2204.1.7.0_x64.zip, then unzip the file. The ubuntu.exe is what we’re looking for.
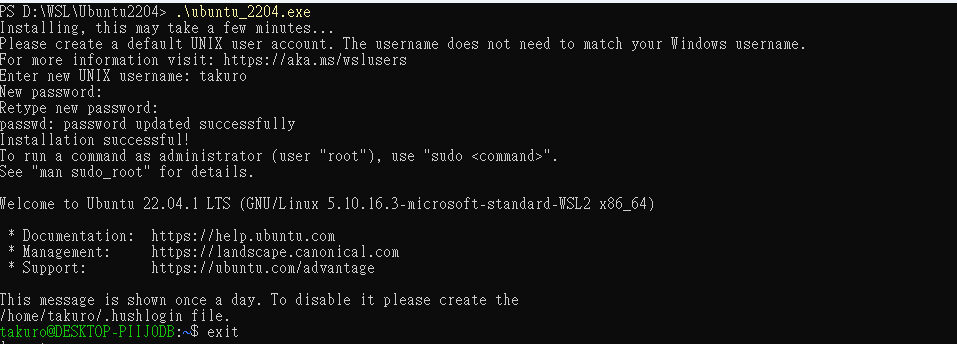
- Open your PowerShell and run as admin, and then execute the ubuntu.exe and follow the instruction to set your username and password, then it’s all done. If you check the folder which the ubuntu.exe locates, you should see
ext4.vhdx. This file represents the virtual hard drive that will be utilized by WSL for the Ubuntu 22.04 system.
- You can type
exitto end the session in Ubuntu. - Enter
wsl -l -vto list out all subsystems and wsl version that you have installed. - Enter
wsl -s [name]to set default distro. - Enter
wsl --unregister [name]to uninstall subsystem. - Enter
wsl --shutdownto stop all subsystems. - Enter
wslto start a default subsystem session. - Enter
explorer.exe [path]to open the path via file explorer

To be honest, I rarely see such detailed analysis on the Internet. Thumbs up! The structure of the article is also very clear and it is very comfortable to read.
The author has a deep understanding of this topic and explains it very clearly. It is very helpful to me. Thank you for sharing!