Recently, I got some requests from my work that want to have our own stable diffusion model. I know there are already a lot of soultions out there. However, even running with Stable diffusion web UI still needs some effort and install dependencies and that’s what I don’t want.
After looking into Replicate‘s github, they provide a open source tool, cog, to solve my headache.
Cog is an open-source tool that lets you package machine learning models in a standard, production-ready container.
https://github.com/replicate/cog
It sounds really good if a model can be just wrapped up as a container and provide an endpoint to be consumed without building another web service.
When I look into their lora repositories, lora-training and lora-inference, it took me some time to understand and figure out how it works since the author didn’t clearly provide an instruction to explain it.
Before we start, I assume that you have realized how LoRA works and have experence in programming and deployment.
I will break it down to few steps.
1. Install cog
You can follow the instruction in cog README. Depends on your OS, it has different approaches to install.
For Mac/Linux, you can instaill it via
brew install cogFor Windows, it can be more works to do. You need to install WSL(Windows subsystem for Linux) 2 first. Then switch to wsl environment to install cog and some other dependencies.
Please just follow their instruction here to install.
I also have written some posts to tell some other issue that you may encounter while installing, so please refer to following post.
2. Clone repositories to any place you want
If you’re using Linux/Mac, it can be really simple. Just git clone the repo to your computer.
https://github.com/replicate/lora-training
https://github.com/replicate/lora-inference
If you’re using WSL on Windows, please do it under wsl environment. To activate WSL, please open PowerShell and simply enter wslto activate it.
3. Run lora-training
Before we get started, let’s take a look about how the flows/steps look like.

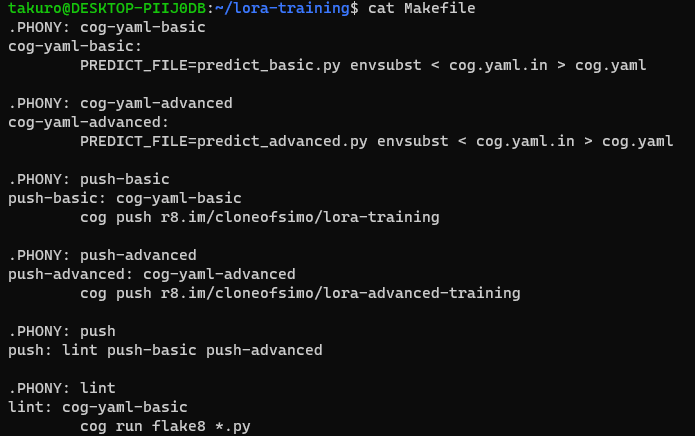
Right now, we have these two repositories, then let’s cd to lora-training repo and enter ls, you may see there is no cog.yaml file, but cog.yaml.in. This part, the author didn’t mention it clearly in README, but if we check the Makefile , you can see that there are some options for us to choose.

cog-yaml-basic: it only provides some basic parameters for us to train LoRA
cog-yaml-advanced: it provides more parameters for us to specific how we like to train LoRA
push-basic and push-advanced: there two are for people who want to push to Replicate to run
Since it has been mentioned on the post title, we want to train it locally, so we only care about cog-yaml-basic and cog-yaml-advanced. To make things easiler, we just try cog-yaml-basic here.
if you want to know what differences between basic and advanced, you can just check predict_advanced.py and predict_basic.py.
Then, simply enter
make cog-yaml-basicYou will see cog.yaml is created.
Following the README, the next step is running
cog run script/download-weights <your-hugging-face-auth-token>You can get auth token for free from huggingface.
This will download pretrained stable diffusion model from huggingface. If you want to change the model version, you can checkout the file at lora-training/script/download-weights.
Once the weight is downloaded, we can build docker image via
cog build -t lora-training-imageOnce the image is built, then we can run it via
docker run -p 5000:5000 -d --name lora-training --gpus all lora-training-imageThen you can check swagger docs at http://localhost:5000/docs.
If you check /predictions endpoint, you will see the request body like below
{
  "input": {
    "instance_data": "https://example.com/",
    "task": "face",
    "seed": 0,
    "resolution": 512
  },
  "id": "string",
  "created_at": "2023-07-12T09:55:03.864Z",
  "output_file_prefix": "string",
  "webhook": "https://example.com/",
  "webhook_events_filter": [
    "start",
    "logs",
    "completed",
    "output"
  ]
}instance_data: It should be a link to a zip file that contains all images that you would like to have the model to be fine-tuned.
task: It’s type of LoRA model you want to train (it can be style, face, or object)
seed: It can be used to fo reproducible training
resolution: It’s the resolution for your training images
Everything out of input object can be ignored for now.
For example:
POST: localhost:5000/predictions
Body:
{
    "input": {
        "task": "style",
        "resolution": 512,
        "instance_data": "https://storage.googleapis.com/xxx/xxx.zip"
    }
}
Once you send a request, the training will start and when it’s completed, you will receive a huge response like this.
You can use following Python script to convert it to .safetensors file.
import base64
import json
import re

if __name__ == '__main__':
    file_name = "pokemon"
    file = open(f"{file_name}.json")
    json_object = json.load(file)
    file.close()

    result = re.sub(r"^data:(.*?);base64,", "", json_object["output"])

    model_data = base64.b64decode(result)

    save_filename = f"{file_name}.safetensors"
    with open(save_filename, "wb") as f:
        f.write(model_data)
        f.close()
If you have gone through the previous steps successfully, then you should have pokemon.safetensers now. This file will be used to running with inference model.
You need to upload this file to somewhere, so the inference model can access it from your request.
4. Run lora-inference
Before starting this section, I would suggest you to stop lora-training container to save some resource and no need to say that GPU can be used by one process.
In lora-inference repo, if you check script/download_weights.py, you can see that you’re required to set some environment variable to get it run.
There are 2 ways to handle this part.
- Copy
stable-diffusion-v1-5-cachefolder from lora-training and rename the folder to bediffusers-cache. Then it’s all done. This one is using model from here. - We need add
.envfile under lora-inference. Then open .env and addMODEL_IDandSAFTY_MODEL_ID.

This way, you can specify what model and safety model you want to use.
Then, you need to download the weight via following command if you choose to assign your own model.
cog run script/download-weights.py <your-hugging-face-auth-token>Once the download completed, you can start to build the image
cog build -t lora-inference-imageThen start running
docker run -p 5001:5000 -d --name lora-inference --gpus all lora-inference-imageThen you should be able to check swagger docs at http://localhost:5001/docs.
The input for /predictions endpoint is like
{
  "input": {
    "prompt": "a photo of <1> riding a horse on mars",
    "negative_prompt": "",
    "width": 512,
    "height": 512,
    "num_outputs": 1,
    "num_inference_steps": 50,
    "guidance_scale": 7.5,
    "image": "https://example.com/",
    "prompt_strength": 0.8,
    "scheduler": "DPMSolverMultistep",
    "lora_urls": "",
    "lora_scales": "0.5",
    "seed": 0,
    "adapter_condition_image": "https://example.com/",
    "adapter_type": "sketch"
  },
  "id": "string",
  "created_at": "2023-07-12T19:14:43.237Z",
  "output_file_prefix": "string",
  "webhook": "https://example.com/",
  "webhook_events_filter": [
    "completed",
    "logs",
    "output",
    "start"
  ]
The following parameter explanations are from here
prompt: It’s input prompt and you can use <1>, <2>, <3> etc to specify LoRA concepts.
negative_prompt: Specify things to not see in the output.
width and height: The size of output image, maximum is 1024×768 or 768×1024 due to memory limitation.
num_outputs: Number of images to output. (minimum: 1; maximum: 4)
num_inference_steps: Number of denoising steps (minimum: 1; maximum: 500)
guidance_scale: Scale for classifier-free guidance (minimum: 1; maximum: 20)
image: Inital image to generate variations of. If this is not none, Img2Img will be invoked.
prompt_strength: Prompt strength when providing the image. 1.0 corresponds to full destruction of information in init image (Img2Img)
scheduler: It can be DDIM, K_EULER, DPMSolverMultistep, K_EULER_ANCESTRAL, PNDM or KLMS
lora_urls: List of urls for safetensors of lora models, seperated with |. If you don’t provide lora_urls, then the image will be generated by default model without any LoRA concept.
lora_scales: List of scales for safetensors of lora models, seperated with |.
seed: Random seed. Leave blank to randomize the seed. It can be used to reproduce the image.
adapter_condition_image: (T2I-adapter) Adapter Condition Image to gain extra control over generation. If this is not none, T2I adapter will be invoked. Width, Height of this image must match the above parameter, or dimension of the Img2Img image.
adapter_type: (T2I-adapter) Choose an adapter type for the additional condition. Can be sketch, seg, keypose or depth.
For example:
POST: localhost:5001/predictions
Body:
{
    "input": {
        "prompt": "a photo of <1> a dog eating a bowl of food",
        "negative_prompt": "frame",
        "width": 512,
        "height": 512,
        "num_outputs": 1,
        "num_inference_steps": 40,
        "guidance_scale": 7.5,
        "scheduler": "DPMSolverMultistep",
        "lora_urls": "https://storage.googleapis.com/xxx/xxx.safetensors",
        "lora_scales": "0.8"
    }
}
If everything went well, the response is a huge json object like this.
You can use following Python script to convert it to .jpgfile.
import base64
import json
import re

if __name__ == '__main__':
    file_name = "image_4"
    file = open(f"{file_name}.json")
    json_object = json.load(file)
    file.close()

    for idx, output in enumerate(json_object["output"]):
        result = re.sub(r"^data:(.*?);base64,", "", output)

        image_data = base64.b64decode(result)

        save_filename = f"{file_name}_{idx}.jpg"
        with open(save_filename, "wb") as f:
            f.write(image_data)
            f.close()
If you request for multipe images but the output doesn’t match your request, then it might be the contain of images are NSFW(Not Safe For Work). You can remove or adjust this restriction via configuration.
Then you will see the image like below

I think that’s it! Hope it helps!!

搶先發佈留言